Posts

Showing posts from 2011

JAVA-10 Short and Float Variables

Image
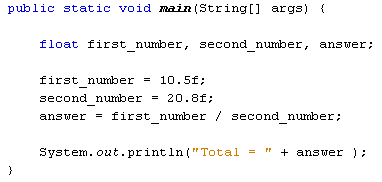
Two more variable types you can use are short and float . The short variable type is used to store smaller number, and its range is between minus 32,768 and plus 32,767. Instead of using int in our code on the previous pages, we could have used short instead. You should only use short if you're sure that the values that you want to hold don't go above 32, 767 or below -32,768. The double value we used can store really big numbers of the floating point variety. Instead of using double, float can be used. When storing a value in a float variable, you need the letter "f" at the end. Like this: float first_number, second_number, answer; first_number = 10.5f; second_number = 20.8f; So the letter "f" goes after the number but before the semicolon at the end of the line. To see the difference between float and double,

JAVA-09 The Double Variable

Image
The double variable can hold very large (or small) numbers. The maximum and minimum values are 17 followed by 307 zeros. The double variable is also used to hold floating point values. A floating point value is one like 8.7, 12.5, 10.1. In other words, it has a "point something" at the end. If you try to store a floating point value in an int variable, NetBeans will underline the faulty code. If you try to run the programme, the compiler will throw up an error message. Let's get some practise using doubles. Change the int from your previous code to double. So change this: int first_number, second_number, answer; to this: double first_number, second_number, answer; Now change the values being stored: first_number = 10.5; second_number = 20.8; Leave the rest of the programme as it is. Your coding window should look l

JAVA-08 Java Variables

Image
Programmes work by manipulating data placed in memory. The data can be numbers, text, objects, pointers to other memory areas, and more besides. The data is given a name, so that it can be re-called whenever it is need. The name, and its value, is known as a Variable. We'll start with number values. To store a number in java, you have lots of options. Whole numbers such as 8, 10, 12, etc, are stored using the int variable. (The int stands for integer.) Floating point numbers like 8.4, 10.5, 12.8, etc, are stored using the double variable. You do the storing with an equals sign ( = ). Let's look at some examples (You can use your FirstProject code for these examples). To set up a whole number (integer), add the following to the main method of your project from the previous section : public static void main ( String[ ] args ) { int firs

JAVA-07 Sharing your Java Programmes

Image
You can send your programmes to other people so that they can run them. To do that, you need to create a JAR file (Java Archive). NetBeans can do all this for you. From the Run menu at the top, select Clean and Build Main Project . When you do, NetBeans saves your work and then creates all the necessary files. It will create a folder called dist and place all the files in there. Have a look in the place where your NetBeans projects are and you'll see the dist folder: Double click the dist folder to see what's inside of it: You should see a JAR file and README text file. The text file contains instructions on how to run the programme from a terminal/console window. Now that you know how to run your java source files, let's do some programming.

JAVA-06 Printing to the Output Window

Image
You can run the code you have so far , and turn it into a programme. It doesn't do anything, but it will still compile. So let's add one line of code just so that we can see how it works. We'll output some text to a console window. Add the following line to your main method: public static void main( String[ ] args ) {        System.out.println( " My First Project " ); } When you type the full stop after "System", NetBeans will try to help you by displaying a list of available options: Double click out to add it to your code, then type another full stop. Again, the list of options appears:   Select println ( ). What this does is to print a line of text to the output screen. But you need to place your text between the round brackets of println . Your text needs to go between a pair of double quotes:  Once you have your double quotes in pla

JAVA-05 Running your Java Programmes

Image
When you run a programme in NetBeans, it will run in the Output window at the bottom of your screen, just underneath your code. This is so that you don't have to start a terminal or console window - the Output window IS the console. There are various ways to run your programme in NetBeans. The easiest way is to press F6 on your Keyboard. You can also run programmes using the menus as the top of NetBeans. Locate the Run menu, then select Run Main Programme : You can also click the green arrow on the NetBeans toolbar:  Another way to run your programmes is from the Projects window. This will ensure that the right source code is being run. Simply right click your java source file in the projects window and you'll see a menu appear. Select Run File . Using one of the above methods, run your programme. You should see something happening in the Output window: The second line

JAVA-04 The Structure of Java Code

Image
In the previous section , you tidied up your code a bit. Here's what your coding window should look like now: You can see we have the package name first. Notice how the line ends with a semicolon. If you miss the semicolon out, the programme won't compile:            package firstproject; //The class name comes next:            public class FirstProject {            } You can think of a class as a code segment. But you have to tell Java where code segments start and end. You do this with curly brackets. The start of a code segment is done with a left curly bracket { and is ended with a right curly bracket }. Anything inside of the left and right curly brackets belong to that code segment. What's inside of the left and right curly brackets for the class is another code segment. This one:           public static void main ( String[ ] args ) {           } The word

JAVA-03 Java Comments

Image
When you create a New Project in NetBeans, you'll notice that some text is greyed out, with lots of slashes and asterisks: The greyed-out areas are comments. When the programme runs, comments are ignored. So you can type whatever you want inside of your comments. But it's usual to have comments that explain what is you're trying to do. You can have a single line comment by typing two slashes, followed by your comment: // This is a single line comment If you want to have more than one line, you can either do this: // This is a comment spreading // over two lines or more Or you can do this: /* This is a comment spreading over two lines or more */ In the comment above, note how it starts with /*. To end the comment, we have */ instead. There's also something called a Javadoc comment. You can see two of these in the coding image on the previous page. A Javadoc comment starts

JAVA-02 The NetBeans Software

Image
When you first run NetBeans, you'll see a screen something like this one: You may have to drum your fingers and wait a while, as it's not the fastest thing in the world. To start a new project, click on File > New Project from the NetBeans menu at the top. You'll see the following dialogue box appear: We're going to be create a Java Application, so select Java under Categories, and then Java Application under Projects. Click the Next button at the bottom to go to step two: In the Project Name area at the top, type a Name for your Project. Notice how the text at the bottom changes to match your project name (in the text box to the right of Create Main Class): firstproject.Main If we leave it like that, the Class will have the name Main. Change it to FirstProject : Now, the Class created will be called FirstProject, with a capital "F", capital "P".

JAVA-01 Getting Started

Getting Started One of the difficult things about getting started with Java is installing everything you need. Even before you write a single line of code, the headaches begin! Hopefully, the following sections will make life easier for you. We're going to write all our code using a free piece of software called NetBeans. This is one of the most popular IDEs (Interface Development Environment) in the world for writing Java programmes. You'll see what it looks like shortly. But before NetBeans will work, it needs you to install the necessary Java components and files. First up is something called the Java Virtual Machine. The Java Virtual Machine Java is platform independent. This means that it will run on just about any operating system. So whether your computer runs Windows, Linux, Mac OS, it's all the same to Java! The reason it can run on